Fennel and Leeks

Fennel and Leeks

Sunday, October 30, 2011

Braised Pork and Coconut Soup


Photo courtesy of Brad Lovejoy

This recipe captured my interest the second I laid eyes on the title. Pork and coconut together in one pot? This could be my personal culinary heaven. As I started to read the recipe in detail and saw that two of the ingredients involved peanuts, I was brought back down to earth. I unfortunately have an allergy to peanuts so I have avoided all recipes that include them up until this point. For some reason, I suddenly had an aha moment and decided that cashews could be used in place of peanuts. I was not sure how the flavor of cashew butter and roasted cashews would translate into the soup but I was confident that the textures would at least be similar. With this adaptation in mind, I set out to prepare the following recipe.

Ingredients:
2 1/2 pounds bone-in pork shoulder
1/3 cup packed brown sugar
4 garlic cloves, minced
coarse salt
3 Tbsp olive oil
2 medium onions, finely diced
2 1/4 cups dry red wine
28-ounce diced tomatoes
1/3 cup creamy natural peanut butter
1 quart chicken broth
2 Tbsp balsamic vinegar
1 Tbsp Dijon mustard
2 tsp fish sauce
1 Tbsp fennel seeds
2 tsp aji chile paste or sambal paste
3/4 cup canned coconut milk
freshly ground black pepper
1 small lime, juiced
1/3 cup roasted, salted peanuts, chopped
1/2 cup loosely packed cilantro, chopped

Rub pork with brown sugar, one third of garlic and one teaspoon salt. Place in glass bowl, cover and refrigerate overnight. Preheat oven to 350 degrees.

Heat 1 tablespoon oil in large pot or Dutch oven over medium-high heat. Add pork and brown on all sides. Remove pork and set aside. Add 1 tablespoon more oil to pot and lower heat to medium. Add half of onions and another third of garlic and sweat by cooking until onions are translucent, about 5 minutes. Pour in 2 cups of wine, increase heat to simmer and reduce liquid by half.

Reserve 1 cup of tomatoes and add rest to pot. Add peanut butter, stirring until it melts into the liquid. Add broth, vinegar, mustard, fish sauce, fennel seeds and chili paste. Bring liquid to boil, add pork back in, cover pot and transfer to oven. Braise pork until the meat is very tender, 3 to 3 1/2 hours.

Remove pork from liquid and set aside to cool slightly. Strain liquid and skim off fat with slotted spoon (alternatively, let the liquid cool completely in refrigerator and skim off fat cap that forms once it is cold). Pull meat away from the fat, discarding fat. Cut meat into bite-sized pieces. Heat remaining tablespoon oil in medium pot over medium-low heat. Add remaining onions and garlic and sweat by cooking them until onions are translucent, about 5 minutes. Add remaining 1/4 cup wine, increase heat to medium-high and reduce liquid by half. Add reserved 1 cup tomatoes and strained soup liquid. Simmer to reduce by one third, about 15 minutes.

Stir in meat and coconut milk. Simmer soup for additional 15 to 20 minutes so flavors come together. Season with salt and pepper. Divide soup among bowls, squeeze a bit of lime juice over each serving and sprinkle with chopped peanuts and cilantro before serving.

This is officially one of my top ten culinary masterpieces since I started this cooking project. The recipe also qualified for my top ten most labor intensive endeavors. It all started yesterday afternoon when I applied a rub to the pork and put it in the refrigerator to marinate overnight. Preparation continued over a five hour period today. The recipe had it all; sauteeing, browning, simmering, braising, boiling, reducing and straining. I have to say, I loved every minute of it. This is the type of recipe I truly enjoy preparing. There is something about starting with a long list of ingredients, an even longer set of instructions and ending up with a beautiful meal.

This recipe is particularly interesting because it incorporates Asian and Italian influences. I wasn't sure how fennel, Dijon mustard, red wine, fish sauce, coconut milk, chile paste and balsamic vinegar would meld together but as they slow-cooked, the flavors combined exquisitely. The dish was also aesthetically pleasing and the aroma was a heavenly mix of red wine, fennel and garlic. Finally, the overall flavor and texture were phenomenal. The soup was rich and creamy but most importantly, the flavor was saturated and complex. I didn't even touch on the texture of the pork yet. If you can imagine the most tender pulled pork you have ever eaten, this pork was that good or even better. It practically fell apart in my hands and melted in my mouth.

The only change I made to the recipe was substituting cashew butter and cashews for peanut butter and peanuts. The cashew butter melted easily into the soup and the cashews provided the perfect crunchy element to the final product. If you have a lot of ambition and five hours to burn in the kitchen (figuratively, not literally :), I highly recommend this recipe.

Recipe Source:
"Girl In The Kitchen" by Stephanie Izard
Pages 82-84
Saturday, October 29, 2011

Owl S'mores


Photo Courtesy of Brad Lovejoy

This may very well be the cutesiest recipe I have ever prepared but I just couldn't help myself. Olivia's preschool hosted a Halloween party on Friday and one of the moms brought these Owl S'mores. They were a huge hit with preschoolers and parents alike. Olivia and I both immediately fell head over heels for the cookies and we decided that these would be our Halloween treat this year. Every year, we prepare cookies for our neighbors and friends, which we then hand-deliver. This is one of my favorite holiday traditions. I was not in the mood to make sugar cookies with sprinkles this year, as we have done for the past two years, so inspiration for these Owl S'mores could not have come at a better time. The best part other than the high degree of adorableness? Preparation is quick, simple and only requires a microwave. Enjoy!

Ingredients:
graham crackers
chocolate chips
large marshmallows
yellow candy melts or white chocolate discs
candy corn

Cut one marshmallow in half and place both pieces on square graham cracker sheet (two perforated sections together). Place candy melt or white chocolate disc on top of marshmallows. Heat in microwave for 2 to 5 seconds; just enough to make marshmallows puff up but not to get them too hot. Remove from microwave and place a chocolate chip on each candy melt or disc while still warm. Place candy corn at base of marshmallows. Allow to cool and serve. May be prepared night before serving.

I found two variations for these cookies that make them more s'more-like. The first is to spread chocolate frosting on a second graham cracker and to layer the owl graham cracker on top. This makes a graham cracker frosting sandwich. The second is to melt chocolate on a second graham cracker and then to layer the owl graham cracker on top. We decided to keep our Owl S'mores simple, which kept the sugar content lower and preparation time shorter.

Recipe Source:
livinglocurto.com

Monday, October 24, 2011

Potato, Red Onion and Feta Frittata


Photo Courtesy of Brad Lovejoy

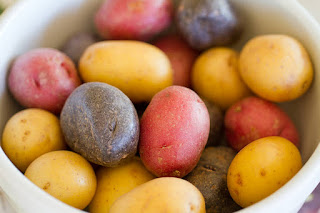
I set out this morning to find a recipe in my new vegetarian cookbook that didn't involve soup or pasta. These are two of my favorite foods so I tend to gravitate toward them to the tune of about 40 percent of the dishes I prepare. I was fortunate to happen upon a fabulous vegetarian cookbook last week at my favorite local used bookstore, Leisure Books, so I decided to peruse the book to see what I could see. I found a recipe for this Potato, Red Onion and Feta Frittata and decided to move forward. The only aspect of the recipe that surprised me is that it doesn't include any herbs or greens. This made my decision for a side dish fairly easy; it needed to be a leafy green. I was craving fresh spinach and Metropolitan Market was offering bunches of lovely, locally grown organic spinach. I also found organic Rainbow Baby Potatoes (purple, red and white; aren't they gorgeous?) and fresh all-natural Feta that were perfect for the frittata.

Photo Courtesy of Brad Lovejoy

Ingredients:
1 1/2 Tbsp olive oil
1 red onion, sliced
12-ounces cooked new potatoes, halved or quartered if large
6 eggs, lightly beaten
1 cup fresh feta cheese, diced
salt and freshly ground black pepper

Heat oil in large, heavy-bottom flameproof frying pan. Add onion and saute for 5 minutes until softened, stirring occasionally. Add potatoes and cook for 5 minutes or more, until golden, stirring to prevent sticking. Spread mixture evenly over base of pan.

Preheat broiler to high. Season beaten eggs, then pour mixture over potato and onion mixture. Sprinkle cheese on top and cook over moderate heat for 5 to 6 minutes until eggs are just set and base of frittata is golden.


Photos Courtesy of Brad Lovejoy

Place pan under broiler and cook top for 3 minutes until lightly golden. Serve frittata warm or cold, cut into wedges.

I haven't yet mentioned that Brad does not necessarily prefer frittatas. He has become an almost non-egg eater since he began eating less meat so I knew making this dinner was a risk. It paid off however, because Brad loved this dish. He joined the clean plate club with his first serving and went back for more. I was fond of this dish as well. The Feta was wonderfully dry and salty, and the potatoes were cooked to the perfect consistency; although I chose to go about cooking them differently than instructed. Because my potatoes were quite small, I simply cut them into halves or thirds and then did not precook them prior to adding them to the onions. I then sauteed the potatoes for 12 minutes instead of 5, which worked well.

The only other adjustment I made to the recipe was to cook the frittata on moderate heat for 3 minutes before putting it under the broiler. I found that the eggs set rather quickly and the bottom was already golden brown after 3 minutes. I then broiled the frittata for 3 minutes, per the recipe, and it was done to perfection. The spinach was lightly sauteed in 3/4 tablespoon of olive oil with a pinch of kosher salt. I also served dinner with orange slices (mostly because we all have colds so I I thought we could use some Vitamin C) but also because it added a fresh and bright element to the meal. I would absolutely prepare this recipe again for dinner or for brunch. If you like a little bit of spice with your egg dishes, try a splash of Cholula Hot Sauce.

Photo Courtesy of Brad Lovejoy

Recipe Source:
"Complete Vegetarian" by Hermes House
Page 296

Saturday, October 22, 2011

Candy Corn


Photo Courtesy of Brad Lovejoy

What is Halloween without a fun cooking project? My friend Heidi, had a great idea to make candy corn with our 3-year-olds, Olivia and Griffin. I have never been a big fan of candy corn but it sounded whimsical and interesting; unlike anything I have prepared prior to today. Heidi and I set out to find a detailed recipe online and came up with the same one by Alton Brown. We figured that if both of us found the same recipe, it must be kismet so we went with it. The recipe follows:

Ingredients:
1 1/4 cups powdered sugar
6 1/2 tsp nonfat dry milk (we used an all-natural product)
1/4 tsp kosher salt
1/2 cup granulated sugar
1/3 cup light corn syrup
2 1/2 Tbsp water
2 Tbsp unsalted butter, room temperature
1/2 tsp vanilla extract (we used organic extract)
2 to 3 drops yellow and orange gel paste food coloring

Combine powdered sugar, dry milk and salt in bowl of food processor. Pulse 4 to 5 times until mixture is smooth and well combined. Set aside.

Combine sugar, corn syrup and water in 2-quart pot. Put over medium heat, cover and cook for 4 minutes. Add butter, clip on candy thermometer and bring mixture to 230 degrees F, about 1 to 2 minutes. When sugar reaches 230 degrees F, take pot off heat and remove thermometer.


Add vanilla and dry mixture, stirring continuously with silicone spatula until well combined. Pour onto half sheet pan lined with silicone baking mat. Cool until mixture is cool enough to handle, about 10 to 15 minutes.

Divide dough into three equal pieces. Add 2 drops yellow food coloring to one piece and knead dough until color is consistent throughout. Add 2 drops orange to second piece and knead until color is consistent. Leave third piece white. Roll each piece of dough into a strand, about 18-inches long. Cut each strand in half.

Roll one of white pieces into a strand about 1/2-inch thick and about 22-inches long. Repeat with yellow and orange pieces. Lay strands side by side and press them together with fingers. Cut combined strand into 4-inch pieces. Lays strands, one at a time, onto silicone mat and press into wedge shape, like a triangle. Use wire butter slicer, metal scraper or knife to cut candies into pieces. Repeat procedure with remaining dough. Lay finished pieces on parchment or waxed paper to dry for one hour. Store in airtight container with parchment paper between each layer.

We had such a good time! The kids were really into it and they were absolutely adorable to watch. They loved measuring ingredients, stirring, kneading and especially tasting. They were in charge of quality control the whole way through and I must say, they did a great job. Homemade candy corn tastes so much better than store bought! The texture is much softer and the flavor of vanilla shines through. If I knew candy corn could taste this good, I would have made it years ago.

One of my favorite parts of this recipe however, was the fact that the kids both chose their favorite colors for the candy instead of the classic orange and yellow. My inclination was to only give them orange and yellow, but Heidi thought it would be better to ask Olivia and Griffin to choose their own colors. I am glad we did it Heidi's way because I think the combination of green, pink and white made the prettiest candy corn I have ever seen. I must give kudos to Heidi because she has some mad candy-making talent. Although this was her maiden candy corn voyage, she was rolling the dough like a pro. :)


Recipe Source:
Alton Brown for foodnetwork.com

Wednesday, October 19, 2011

Curry Green Onion and Curry Pineapple


Photos Courtesy of Brad Lovejoy

Tonight I decided to tap into my Grammie's vast cooking knowledge and enormous library of gourmet recipes. To say that my grandma has a large cookbook collection is a gross understatement. Let's just say she is the only person I know with a built-in bookcase that stretches across an entire wall and is used exclusively to house cookbooks. She would need to comment on the exact cookbook quantity but I am telling you, if you are looking for a type of cuisine, a particular recipe or you want to learn about the cooking in a specific region of a specific country, my Grammie's library is the place to go.

In addition, I can't even begin to list all of the countries she has lived in and/or visited. With her extreme interest in cooking and her raw talent, she has been able to learn to prepare cuisines from all over the world. This leads me to my point which is that she shared two curry recipes with me. She originally learned both dishes from one of her friends while living in Sri Lanka. I chose both recipes to prepare for tonight's dinner.

The first dish I prepared is Curry Green Onion and the second dish is Curry Pineapple. My Grammie also sent a formula for making my own curry powder but I will save that for another time. For tonight's recipes, I used curry powder that I already had on hand. Before I make further comment on the recipes, I will provide them for review.

Curry Green Onion-
Ingredients:
1 bunch green onions
2 medium tomatoes, sliced thinly lengthwise
1 tsp curry powder
1/2 tsp chile powder
2 tsp butter
salt to taste

Mix all ingredients in saucepan and allow to cook over low heat until cooked down; well done. Serve as side dish or with Naan bread.

Curry Pineapple-
Ingredients:
1 20-ounce can pineapple chunks, drained
1/4 onion, chopped
1/2 tsp chopped garlic
small amount of chopped ginger (approximately size of a quarter)
1 tsp chili powder
1 tsp curry powder
1 cinnamon stick broken in half
about 3 Tbsp cooking oil (I used Canola)
1-2 tsp sugar

Mix all ingredients in saucepan and add about 3 tablespoons of oil. Simmer until onions and garlic are soft and pineapple is coated. When cooked, stir in sugar and serve.

The consensus is in. Both recipes were delicious! I especially liked the Curry Green Onion dish because I love tomatoes and I tend to prefer savory dishes to sweet dishes (unless we are talking dessert, of course). The green onions paired nicely with the tomatoes and the addition of butter to provide creaminess worked beautifully. I would not change anything about this recipe.

The Curry Pineapple dish was delicious as well but I found myself wishing there was a bit less oil. I would reduce the amount of oil to 1 or 1 1/2 tablespoons, which would change the consistency a bit but I believe it would be more to my liking. What did work well in this recipe however, is the combination of cinnamon, curry, chili powder and ginger. The flavor profile was tasty and definitely up my alley. I served both dishes with All-Natural, Hand-Stretched Tandoori Naan by a company called Stonefire Authentic Flatbreads. I served the Curry Green Onion with Garlic Naan and the Curry Pineapple with Original Naan. Thank you Grammie, for inspiring such a lovely dinner!

Recipe Source:
Mary Moore (a.k.a. Grammie extraordinaire)

Sunday, October 16, 2011

Fresh-Frozen Chard and Arugula


Photos Courtesy of Brad Lovejoy

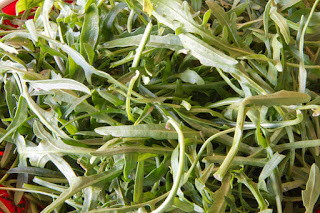
I walked down to my garden today and realized that I still have ample opportunity to harvest and freeze the last of my summer greens. The two types of greens that are the most prolific are chard and arugula so I thought I would concentrate on learning how to properly freeze each one. After researching the best way to go about this process, I learned that all greens with the exception of lettuce can be frozen. All you need is a big pot, a big bowl or sink, water, slotted spoon, strainer, freezer bags and a sharpie pen. I also learned the following process.

Step One: Wash greens and remove stems. Chop into manageable-sized pieces.

Step Two: Submerge greens in boiling water for 30 seconds (for finer greens like arugula) to two minutes (for heartier greens like collards). I boiled the chard for just over a minute because it is mid-range on the heartiness scale.

Step Three: Move hot greens to cold water with slotted spoon and submerge until heat has been removed. You may need to freshen water if it gets too warm. This process is called blanching.

Photo Courtesy of Brad Lovejoy

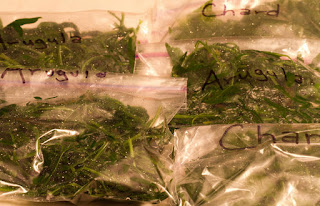
Step Four: Place greens in strainer to remove excess water (I added this detail because the greens were quite wet). Pack into freezer bags, remove air and seal. Label bags with type of vegetable and date packed. If there is a lot of one green, separate into 1-cup serving sizes and put in freezer bags for single servings.

Photo Courtesy of Brad Lovejoy

This process was so easy! The only time consuming part was separating the arugula greens from the stems. I must have purchased a different variety of arugula than I am accustomed to growing. This particular type of arugula is smaller thus more tedious to remove and prepare. What started out as a sink full of arugula stems, ended up as three 1-cup bags of blanched arugula. Chard on the other hand, is very easy to prepare. While doing my research, I learned that chard stems don't freeze well so the greens must be cut from the stems. I usually chop the stems and cook them with the greens but this does not work well for freezing. The only necessary task for getting the chard ready was to cut each side away from the stem and then to chop the greens into smaller pieces. Now the arugula and chard are ready to be used for various winter soups and pasta dishes. What a breeze! I plan on freezing my Dinosaur Kale tomorrow.

Recipe Sources:
ritasroots.wordpress.com
shinycooking.com

Wednesday, October 12, 2011

Red Velvet Cupcakes


Photo Courtesy of Brad Lovejoy

I received a cupcake cookbook called "Babycakes" along with mother-daughter matching vintage cupcake aprons as a gift over the weekend. Olivia and I immediately decided that cupcakes would be on the blog recipe docket this week. This cookbook is unique because the recipes are gluten free, mostly vegan and mostly low sugar. As many of you know already, I eat sugar and gluten and I am not vegan or even vegetarian. I am however, always interested in trying a new type of cooking. I leafed through the book and immediately decided on the following Red Velvet Cupcake recipe.

Ingredients:
1/2 cup rice milk
2 Tbsp apple cider vinegar
3 1/4 cup whole spelt flour
1/3 cup unsweetened cocoa powder
1 Tbsp plus 1 tsp baking powder
1/2 tsp baking soda
2 tsp salt
2/3 cup coconut oil
1 1/4 cups Agave Nectar
2 Tbsp pure vanilla extract
5 Tbsp natural red food coloring
vanilla frosting

Preheat oven to 325 degrees. Line 12 cup muffin tin with paper liners. Pour rice milk and apple cider vinegar into small bowl, but do not stir; set aside to develop into "buttermilk".

In medium bowl, whisk together flour, cocoa powder, baking powder, baking soda and salt. Add oil, agave nectar and vanilla to dry ingredients and stir to combine. Batter will be thick. Using plastic spatula, add "buttermilk" and mix just until combined. Slowly add food coloring by the tablespoon until batter is desired color. Do not exceed 6 tablespoons, as this will make batter too wet.


Pour 1/3 cup batter into each prepared cup, almost filling each. Bake cupcakes on center rack for 24 minutes, rotating the tins 180 degrees after 14 minutes. Finished cupcakes will bounce back slightly when pressed, and toothpick inserted in center will come out clean. Let cupcakes stand in tins for 20 minutes, then transfer them to wire rack and cool completely. Using frosting knife, gently spread 1 tablespoon frosting over each cupcake. Store cupcakes in airtight container in refrigerator for up to three days.

The recommended frosting for these cupcakes was a soy-based vanilla frosting from the same cookbook. I have a mild allergy to soy so I was not able to use the recipe. I instead chose an organic vanilla frosting mix by a brand called Dr. Oetker. The frosting is clearly not vegan since it calls for 1/3 cup of butter and 1/4 cup of milk. It is tasty for sure but I rationed out the amount for each cupcake in order to avoid excess fat from copious amounts of butter. I must admit however, that butter cream frosting is delectable! Oh, and as an added bonus, my sous chef is adorable.


Regarding the cupcake part of the recipe, the verdict is in. We are not fans of Agave Nectar at our house. It seems to leave an indescribable aftertaste and a strange feeling in the throat. I really liked several things about this recipe but if I was to prepare it again, I would need to find a substitute for Agave Nectar. I understand the main perk of agave; it takes longer to absorb into the bloodstream so it doesn't shoot blood sugar up the way refined sugars do. Even with this health benefit, I can't bond with it.

One of my favorite aspects of the recipe is that it calls for coconut oil, which is fabulous for our bodies. The oil is high in omega-3 fatty acids, packed with lauric acid and stores as energy, not fat. It also supports proper function of the thyroid, which helps boost metabolism. I seem to like the flavor and consistency of all things coconut so it is hardly a surprise that I favor coconut oil. I also appreciate that the recipe creates "buttermilk" by combining apple cider vinegar and rice milk. This is such an interesting concept. As I stated before, I am not vegan or vegetarian, but I do appreciate a healthy cooking trick to keep up my sleeve.

Other than my dislike for Agave Nectar, the only disappointment in the recipe is that despite my use of the required amount of natural food coloring, my cupcakes were still more brown than red. I guess that makes them Brown Velvet Cupcakes? Thank goodness my sous chef decided to add red sprinkles to half of the cupcakes. :)

Recipe Source:
"Babycakes" by Erin McKenna
Page 97

Monday, October 10, 2011

Jerusalem Artichoke (Sunchoke) Gratin


Photo Courtesy of Brad Lovejoy

Okay, I have a funny story about my trip to PCC Market to acquire Jerusalem Artichokes, also known as sunchokes. I have never eaten nor prepared this vegetable so I was completely clueless. I made my way to the produce department and carefully selected two of what I thought were the best looking Jerusalem Artichokes in the bunch. I casually asked the produce expert if the artichokes I chose looked like good ones and he gently informed me that I had chosen celery root, not Jerusalem artichokes. Okay, really? I just started laughing at myself and he led me over to the correct item. I did however, have a lovely conversation with him during which I learned that shredded celery root is delicious when added to hashbrowns or as a substitute for hashbrowns. Don't be surprised if you see celery root hashbrowns as a featured recipe in the future.

Now that I had the correct main ingredient, I made my way home to start preparation. For those of you that are in the same boat as me and are not familiar with Jerusalem artichokes, I have included a photo above for your review. As you can see, this is not the prettiest of vegetables. It does however, have a unique and somewhat mysterious appeal so before preparing, I decided to do a bit of research. I learned that sunchokes are traditionally tubers that were boiled and eaten much like potatoes and that they can be used as a substitute for potatoes in many recipes. They have a waxy flesh with the texture of crisp apples and a flavor reminiscent of sunflower seeds. Washington is one of the leading commercial producing areas, which is appealing to me since I prefer using locally grown organic products. They are best harvested in the fall when light frosts enhance their natural sweetness. The recipe follows:

Ingredients:
4 cloves garlic, chopped
2 1/2 Tbsp extra virgin olive oil
1 1/2 lbs Jerusalem artichokes
sea salt and freshly ground pepper to taste
1 Tbsp chopped fresh parsley

Preheat oven to 350 degrees. Heat garlic and oil in small pot and cook, until soft. Peel Jerusalem artichoke and cut into small chunks, dropping chunks in bowl of acidulated water as you work. (Acidulated water is water to which a little acid is added. Lemon juice, lime juice or vinegar are normally used; 1/2 tsp per cup of water. When peeling fruits or vegetables that discolor quickly, this is a great process to use to prevent discoloration). Put in shallow roasting pan large enough to hold everything in one layer comfortably. Strain garlic from oil an pour oil over chokes. Add salt and pepper to toss.

Bake in oven for about 20 minutes, stirring once or twice, until tender. Sprinkle parsley on top and serve as side dish.

The bad news is, I could not make this recipe work, thus the lack of photo. The idea behind it is quite nice but it seems to be missing components. The photo that accompanies the recipe shows a golden breadcrumb topping, which is the type of gratin that is familiar. The actual recipe however, does not include any topping other than salt, pepper and parsley. As the gratin finished baking for the required 20 minutes, I realized that there was nothing present in the recipe to give it the crispy topping that makes gratin special. The sunchokes were also barely cooked so at this point, I decided to improvise. I added about 2 Tbsp of breadcrumbs and a sprinkle of Parmesan across the top with a dash of olive oil and then put the baking dish back in the oven for an additional 20 minutes. After the additional time, the sunchokes were still not fully cooked and the entire dish had become dry. I am sure this is due to the extra time and the fact that the only initial moisture in the dish was 2 1/2 tablespoons of olive oil.

The good news is, I really like the flavor of sunchokes. Before tasting them, I couldn't quite understand how they could taste like sunflower seeds but they actually have a nutty flavor that resembles the seeds. I also agree that the texture is very similar to the texture of potatoes. It would be easy to substitute potatoes for sunchokes but I do not think I would do so for one reason. Sunchokes are fairly labor intensive to peel because of their knobby nature so I would stick with potatoes. I would however, try another recipe. I found a recipe for a sunchoke soup by the same author of this recipe, Becky Selengut, that I may try. I usually fully enjoy her recipes so I have not lost faith. I also like the idea of Jerusalem artichokes; it just did not work for me in this application.

Recipe Source:
"Washington Local And Seasonal Cookbook" by Becky Selengut, Jennifer Sayers Bajger and James Darcy with contributions by Jennifer Ogle
Page 132

Thursday, October 6, 2011

Number One Best Lasagna


Photo Courtesy of Brad Lovejoy

We have a new tradition of watching Thursday night football at Carl's house so this week, I decided to make a good old-fashioned meat lasagna to take along. I only give the gift of non-vegetarian lasagna to my family about once a year so this is practically monumental. I also tossed my all-organic ingredient rule aside in favor of a hybrid list of ingredients. I purchased basic lasagna products such as Frigo Mozzarella and Ricotta, Barilla lasagna noodles, San Marzano tomatoes, Jennie-O ground turkey and Hunt's tomato paste. The Italian Sausage, Parmesan and whole nutmeg are natural products; the garlic, parsley and onion are organic; the basil is from my garden but all other products are mainstream.

Photo Courtesy of Brad Lovejoy

I found this recipe online and chose it for two reasons. First of all, I found it on a site called mylasagnarecipe.com. This website is all about lasagna and this is the recipe they have deemed to be their number one. How could I pass it up? I also made this choice because the recipe has received rave reviews from multiple readers. I am always pleased when a recipe website provides readers a place to post their thoughts on a particular recipe, along with their results. It helps me weed out most of the duds. The recipe follows:

Ingredients:
1 pound of sweet Italian sausage
1 pound of ground beef (I used 97/3 ground turkey since we don't eat beef)
1/2 cup of chopped onions
2 cloves of garlic chopped
1 (28 ounce) can of crushed tomatoes
2 (8 ounce) cans of tomato sauce
2 (6 ounce) cans of tomato paste
1/2 Cup of Water
2 tablespoons
white sugar
1 teaspoon fennel seed
2 teaspoons fresh Basil leaves chopped
4 tablespoons fresh Italian parsley chopped
1 teaspoon salt
1 teaspoon Italian Seasoning
1/2 teaspoon ground pepper
23 ounces of ricotta cheese
1/2 teaspoon fresh grated nutmeg
1 egg
1 pound shredded mozzarella cheese
1 cup grated Parmesan cheese
12 lasagna noodles

Add ground turkey, Italian sausage, onion and garlic to dutch oven pot. Brown meat mixture over low-medium heat. This takes 6-9 minutes. Add crushed tomatoes, tomato sauce, tomato paste and water. Stir ingredients together. Then add Italian seasoning, salt, ground pepper, fennel seed, white sugar, two tablespoons chopped parsley and basil. Gently stir to combine. Simmer for one hour and thirty minutes. If you don't have this amount of time, an hour will still work great.


In mixing bowl, combine ricotta, fresh ground nutmeg, egg and two tablespoons parsley. Stir together.


To layer lasagna, first spread 2 cups meat sauce over bottom of 9" X 13" pan. Layer noodles (should take about 6) over sauce and spread half of ricotta mixture over noodles. Sprinkle half of mozzarella over ricotta layer and half of Parmesan over mozzarella. Spread 2 cups sauce over cheese and then one more layer of noodles. Spread remaining ricotta over noodles, mozzarella and Parmesan over ricotta, leaving a bit of each to sprinkle on top, and last layer of sauce on cheeses. Sprinkle remaining cheese on top.

Cover with foil and bake at 350 degrees for 25 minutes. Uncover and bake for additional 25 minutes. Remove from oven and allow to cool for 15 minutes. Serves 12.

This was my most enjoyable cooking experience of the past few months and the lasagna was delicious! The kicker is that there could not be a lasagna recipe that is more suited to Brad's palate. He, Carl and Olivia absolutely loved the final product. From where I sit, other than subbing ground turkey for ground beef (since we don't eat beef), there is only one change that would make it better. I usually prefer to use Barilla flat lasagna sheets that require no boiling prior to layering. For this recipe however, I do believe Barilla lasagna noodles with crinkled edges would work better. This recipe produces an ample amount of meat sauce and in order to support and balance the sauce, thicker noodles would be ideal. Other than this one change, I would leave well enough alone. The author of this recipe really has meat lasagna dialed in.

A few final comments. This was the first time I have cooked a recipe that calls for grated whole nutmeg. I must say, I cannot believe the difference in flavor between ground nutmeg and grated whole nutmeg. I read an article today about how nutmeg loses oil once it is grated and this is the reason fresh nutmeg tastes so much better. Makes sense to me. I snapped a photo for those of you that are not familiar with the appearance of nutmeg. I am now excited to use it in a freshly grated form for my fall recipes and especially for eggnog. It smells heavenly and the flavor is gorgeous.


Finally, although this recipe was a bit time consuming and labor intensive, I would like to recommend making lasagna sauce from scratch when time is not an issue. I have prepared pasta sauce from scratch several times and there is nothing that compares. Although this recipe did not require blanching, peeling and cooking tomatoes down for the sauce, it still delivered a homemade quality product. There is simply nothing like homemade sauce. Enjoy!

Recipe Source:
mylasagnarecipe.com

Saturday, October 1, 2011

Maharaja's Dal


Photo Courtesy of Brad Lovejoy

A quick apology that the recipes have been a bit sparse for the past few weeks. I was under the weather for several days and then in Vancouver BC so I am a skosh behind. Rest assured I will make up for it during the coming week.

When we were in Vancouver BC last week, Brad attended a business lunch at an Indian restaurant that is known to be one of the city's best. It was his maiden voyage into Indian food and I was excited when he brought take-out back to our hotel room and reported that he really liked the cuisine. Yippee! Another type of food I can cook at home! I haven't eaten Indian food in quite some time so I can't wait to prepare new recipes and to also try the two Indian restaurants in our neighborhood. Brad's discovery opens a whole new door for us.

I was browsing through the October addition of PCC Market's newspaper and came across this recipe for Dal. It was a timely find for sure because I planned to begin an online search for a recipe. For those of you that aren't familiar with Indian food, Dal is a preparation of lentils, beans or peas that have been stripped of their outer shells and split. It also refers to a thick stew prepared with these ingredients. Dal can also be spelled Daal, Dhal or Dahl. This recipe calls for red lentils as the base ingredient and then several spices, herbs and vegetables to season the Dal. Recipe follows:

Ingredients:
1 cup split red lentils
2 cups water
1/4 cup vegetable oil
1 tsp mustard seeds
1 tsp cumin seeds
5 fenugreek seeds
1 hot chile pepper
1 medium onion, diced
8 cloves garlic, finely minced
2 tsp finely grated fresh ginger
1 tsp turmeric
1/2 tsp ground coriander
1/2 tsp ground cumin
1 tsp paprika
1 fennel bulb, thinly sliced
2 medium tomatoes, chopped fine
1/4 cup chopped cilantro leaves and stems
juice of 1 lemon
2 tsp kosher salt
2 cans red kidney beans, drained

Add lentils to medium-sized pot, cover with water and simmer over medium heat until tender. While lentils are simmering, heat oil in large pot over high heat with mustard, cumin and fenugreek seeds. Cover pot and heat until mustard seeds complete popping sounds. Quickly add chile pepper. Let chile roast in hot oil, then add onion, garlic and ginger. Chile then can be removed if desired.

Lower heat to medium and stir well. Let onion become translucent; add turmeric, coriander, cumin and paprika. Stir well and let dry spices release their essence into oil. Take care not to let them burn (if needed, add more oil to prevent burning). Next, add fennel bulb and saute for a few minutes.


Add tomatoes, cilantro stems (reserve leaves for garnish), and lemon juice. Allow tomatoes to reduce down and form paste with onions. This will take a few minutes and will form base of curry. Season with salt. It is important to not leave stove. Watch pot for signs of burning and constantly stir mixture. If mixture starts to dry out, add small amounts of water.

When mixture reaches thick consistency and dark red color, add cooked lentils. Stir well, letting lentils incorporate into curry base. Add kidney beans. For soupier consistency, add more water.

I cannot provide an accurate description of the aroma of the spices that could possibly do it justice. It smelled spicy, savory and rich; all at the same time. I had never cooked with whole mustard seeds and it is interesting how they pop when they cook in oil. The sound was quite similar to popcorn as it pops, only muted. It was also my maiden voyage with fenugreek seed. I learned that fenugreek leaves are used as an herb and fenugreek seeds are used as a spice. It is very similar to wild clover, was originally found in the Near East and is now grown worldwide. The ingredient is mainly used for pickles, curries and pastes. Anyway, the aroma of the spices was amazing. I also want to note that this was the first time I have seen a recipe call for cilantro stems. I didn't have a clue that the stems are as flavorful as the leaves but now that I know, I will start using them regularly.

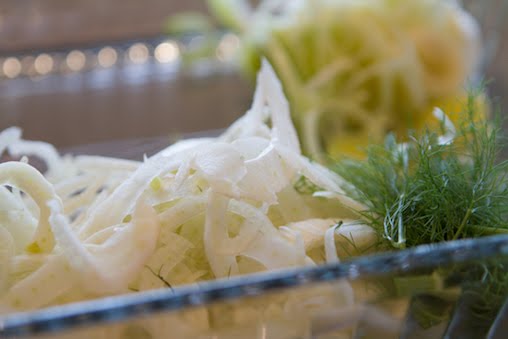
I enjoy fennel in many applications so I was interested to see how it would compliment the spices and herbs in this recipe. I have to say, the combination was perfect. Fennel provided a fresh, slightly crunchy element that added to the success of the texture. I did however, make one change to the recipe. After I added the first can of kidney beans, I immediately knew that this amount was plenty. I believe the second can would have been overkill so I fully recommend using only one can.

I served the Dal over long grain white rice with baked chicken on the side for Olivia and Brad. The Dal with a little bit of rice was the perfect dinner for me but I wanted to provide additional protein for Brad and Olivia. All in all, this recipe was a tremendous success. The best part? We have plenty left over for dinner tomorrow night.

As a quick side note, I used all organic or free range ingredients for this meal. Just the way I like it!

Recipe Source:
PCC Sound Consumer Newspaper, October 2011