Fennel and Leeks

Fennel and Leeks

Monday, September 26, 2011

Fusili With Roasted Tomato Sauce


Photo Courtesy of Brad Lovejoy

I have been craving pasta for the past few days but I have done nothing about it. When Olivia and I picked several fresh tomatoes from our garden yesterday, I finally found incentive to search for a pasta recipe. There was a bag of organic fusili in the cupboard waiting to be used and fresh basil in the garden waiting to be picked so when I found this recipe for Fusili With Roasted Tomato Sauce, I knew it was the perfect fit. The recipe calls for 3 1/2 pounds of tomatoes but we only picked about 2 pounds from the garden. I ran up to PCC Market to get the additional pound and a half of tomatoes plus ingredients to make a green salad. Let the prepping and cooking begin!

Ingredients:
2 Tbsp extra virgin olive oil, divided
6 large tomatoes (about 3 1/2 pounds), cored, cut in half crosswise and seeded
3 garlic cloves, crushed
1 tsp chopped fresh thyme or 1/4 tsp dried
3/4 tsp salt, divided
2 garlic cloves, chopped
2 1/2 Tbsp chopped fresh basil
1/4 tsp black pepper
3 1/2 cups hot cooked long fusili (about 8 ounces uncooked pasta)
1/4 cup ( 1 ounce) fresh grated Parmesan cheese
basil sprigs (optional)

Preheat oven to 400 degrees. Brush jelly roll pan or shallow roasting pan with 1 tablespoon oil. Arrange tomatoes in single layer, cut sides down, in pan. Arrange crushed garlic around tomatoes; sprinkle tomatoes with thyme and 1/4 teaspoon salt.


Bake at 400 degrees for 30 minutes; drain juice from pan. Bake additional 30 minutes. Remove tomatoes from pan; cool slightly. Discard juice and crushed garlic. Peel and coarsely chop tomatoes.

Heat 1 tablespoon oil in large nonstick skillet over medium-low heat. Add chopped garlic, and cook 2 minutes, stirring frequently. Add chopped tomatoes and basil, and cook 3 minutes or until thoroughly heated. Stir in 1/2 teaspoon salt and pepper. Add pasta and toss to coat. Sprinkle with cheese; garnish with basil sprigs, if desired.

Although this is not the sexiest dish I have prepared thus far, it did have a rustic appeal that we appreciated. The flavors were clean and simple and as a tomato connoisseur, I could taste the roast on the tomatoes as the first bite touched my tongue. There is just something about roasted vegetables that make them seem a bit decadent. I especially love the flavor that roasting imparts on tomatoes and peppers; even more so when they are being used as the base for a sauce or soup. All in all, we thoroughly enjoyed the dish and I would consider making it again. I did add an extra tablespoon of olive oil to the finished product because it looked as though the pasta might be a tiny bit more dry than we prefer.

As a side note, even before I prepared this recipe, I wondered if I was seeding tomatoes correctly. Before coring and seeding them tonight, I looked online to see if there was a better method than the squeezing method I employ. I found a great set of instructions and options on allrecipes.com that includes squeezing, using your finger, or using a spoon to remove the seeds. I found that squeezing works well with ripe tomatoes and using my finger or a knife (I preferred using a knife to using a spoon) works well with firm tomatoes. One of the aspects of this cooking project I have enjoyed most is learning simple food preparation techniques that I have always wondered about, such as boiling an egg correctly and seeding tomatoes. Having some of these basic techniques under my belt has made me a much better cook. Now if I could only learn some knife skills!

A special thank you to my little blonde cooking fairy. Yes, I really am saying that she acted as my Sous Chef while wearing a fairy costume. I am kicking myself for not snapping a photo but you will have to trust me; fairies do indeed cook. :)

Recipe Source:
Cooking Light Magazine, January 2003 via myrecipes.com

Thursday, September 22, 2011

Vegetarian Tortilla Soup With Avocado-Corn Salsa

Photo Courtesy of Brad Lovejoy

I have always been a fan of tortilla soup but finding a recipe that doesn't include chicken is close to impossible. When I ran across this recipe in my favorite vegetarian soup cookbook, I was ecstatic, to say the least, but also puzzled by how I could have overlooked it prior to today. I received this cookbook for a wedding gift 6 1/2 years ago so one would think that I would have noticed the recipe by now. I guess I need to stare at something multiple times or get hit over the head with it in order to take notice. :) The important thing is that I found the recipe now. I was excited to try a chickenless version of tortilla soup that still seemed to include classic ingredients. The added bonus is the soup's topping; avocado-corn salsa. Recipe follows:

Ingredients:
Salsa-
1 Tbsp extra-virgin olive oil
1 Tbsp fresh lime juice
2 tsp minced fresh jalapeno chili, or to taste
2 cloves garlic, minced
1/4 tsp sugar
1 avocado, peeled, pitted and cut into 1/2 inch dice
1/4 cup frozen corn kernels, thawed
2 Tbsp minced red onion
2 Tbsp minced fresh cilantro
salt and freshly ground pepper to taste

Soup-
1 Tbsp olive oil
1 cup coarsely chopped onion
1/2 red bell pepper, seeded, deribbed and coarsely chopped
1 celery stalk with leaves, coarsely chopped
4 cloves garlic, minced
1/2 tsp ground cumin
3 cups vegetable stock
1 15-ounce can garbanzo beans or black beans, drained and rinsed
1/2 tsp freshly ground pepper
pinch of red pepper flakes
2 Tbsp minced fresh flat-leaf parsley
salt to taste

Tortilla Strips-
2 Tbsp olive oil
3 6-inch tortillas, halved and cut into 1/4" strips

To make salsa, whisk together oil, lime juice, jalapeno, garlic and sugar in small bowl. Gently stir in avocado, corn, red onion and cilantro. Season to taste, set aside.

To make soup, heat oil in Dutch oven over medium heat. Add onion, bell pepper, celery and leaves, and garlic; cook, stirring occasionally, until vegetables are crisp-tender, about 8 minutes. Add cumin; stir for about 30 seconds. Stir in vegetable stock, tomatoes, beans, pepper and red pepper flakes. Increase heat to high and bring to boil. Reduce heat; cover and simmer until vegetables are tender, about 20 minutes. Stir in parsley and salt. Taste and adjust seasoning.

To prepare tortilla strips, heat olive oil in large skillet over medium heat. Add tortilla strips in single layer. Cook, turning occasionally with tongs, until strips are lightly browned and crispy, about 10 minutes. Transfer strips to plate lined with paper towel. Top each bowl of soup with tortilla strips and mound of salsa.

First of all, I am going to come clean and admit that I used pre-made, all-natural tortilla strips. The strips I chose contain canola oil, tortillas and sea salt but most importantly, they have no trans-fat. I was going to prepare strips from scratch but I haven't yet bonded with the idea of pan frying starches in oil. I decided that it worked best for me to use natural pre-made tortilla strips. Second of all, although this recipe is from a vegetarian cookbook, I used organic low-sodium chicken stock in lieu of vegetable stock because I already had it in my cupboard. If you prefer to maintain the vegetarian status of this soup, go ahead and use vegetable stock per the recipe. Either option is acceptable.

The final result was delicious. I was a bit skeptical about the broth flavor while tasting to determine how much salt and pepper was needed, but once the salsa and tortilla strips were added, the soup was near perfection. I was particularly fond of the garbanzo beans. The recipe provided the option of garbanzo beans or black beans but I chose garbanzo beans because it seemed like the less obvious choice. I loved the slightly crunchy texture the beans added to the soup and I am certain that black beans would not have provided the same texture. I also thought the avocado-corn salsa brought the perfect level of acidity and creaminess to the soup while the cumin provided just the right level of spiciness. Creamy plus acidic plus crunchy plus spicy equals just plain tasty....... a recipe for success.

Recipe Source:
"A Beautiful Bowl of Soup" by Paulette Mitchell
Page 76

Wednesday, September 14, 2011

Coconut Almond Granola

Photo Courtesy of Brad Lovejoy

Granola has been on my recipe radar for a few months but I am just now getting around to it. I was planning on preparing my mom's granola recipe but I was sidetracked by beautiful fresh coconut that our family friend, Dulce, extracted over the weekend and left in our refrigerator. I have never eaten fresh coconut so I wasn't sure how to use it. Isn't it a gorgeous product?

Photo Courtesy of Brad Lovejoy

Dulce immediately mentioned that granola with fresh coconut is delicious so I decided to take her recommendation. In typical Kiersten style, I googled coconut granola and found this wonderful recipe that incorporates some of my favorite ingredients; honey, almonds, cinnamon and vanilla. I promise to make my mom's granola before the year is over (it is quite possibly the perfect granola) but I am giving this coconut version a whirl for now. One quick side note. I had all of the ingredients in my cupboards so I didn't have to buy a thing. I love it when that happens! Recipe follows:

Ingredients:
3 cups rolled oats
1/2 cup unsweetened coconut flakes
1/2 cup crushed raw almonds
1/4 cup craisins or other dried fruit (I used raisins)
2-3 Tbsp sugar
pinch of salt
1/2 tsp cinnamon
2 Tbsp Canola oil
5-6 Tbsp honey
1 tsp vanilla extract

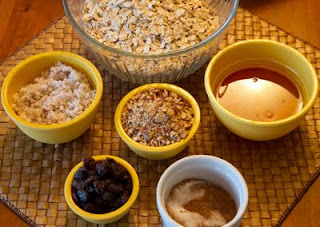
Photo Courtesy of Brad Lovejoy

Preheat oven to 325 degrees. Mix first seven ingredients together in large bowl. In small saucepan over medium-low heat, warm oil, honey and vanilla extract. Pour liquid over dry ingredients and mix well. Spread evenly across baking sheet and cook for 25 minutes, stirring a bit near halfway point. Depending on size of baking sheet, you may need to bake in two batches. If granola is crowded, it will not get crisp texture and golden color. Once granola is visibly browned, move into bowl and allow to cool. Place in container with airtight seal. Should keep for two weeks. Place in freezer after two weeks. Great with milk or over yogurt.

Okay, all I have to say is YUM!!! This is a terrific granola recipe and I am now officially wild about fresh coconut. I am quite particular about the sweetness level of granola and this recipe was not too sweet. I only used 2 tablespoons of sugar, which was on the lower end of what the recipe called for, but it was the perfect amount for me. I had a feeling that this amount of sugar would be plenty with 5 tablespoons of honey and the sweetness from the raisins. As the original author of this recipes notes, most granola recipes include a full cup of sugar and sometimes even butter. This recipe keeps things healthy by keeping the sugar content low and using only two tablespoons of Canola oil. If you are a person that appreciates good granola, I encourage you to try this recipe. I will undoubtedly be making this again.

As a side note, I used all organic ingredients with the exception of Quaker Oats. Also, if you have not yet tried Madagascar Pure Vanilla Extract by Simply Organic, I urge you to run out to the store to buy some. It provides a much deeper and intense vanilla flavor than run-of-the-mill vanilla extract.

Recipe Source:
mylittlecelebration.com

Tuesday, September 13, 2011

Easy Herbed Grilled Salmon

Photo Courtesy of Brad Lovejoy

I bought a beautiful piece of freshly caught King Salmon at Metropolitan Market with the intention of throwing it on the barbecue. I didn't know exactly how I wanted to season the salmon prior to cooking so I needed to do a little bit of leg work. I usually prepare salmon with a sprinkle of kosher salt and pepper and I have already cooked salmon with a miso-soy glaze for the blog so I was looking for something entirely different. Lucky for me, I immediately stumbled upon this recipe for Easy Herbed Grilled Salmon. I was excited about using white wine and sweet paprika so without looking further, I moved forward with the following recipe:

Ingredients:
1-1/2 pounds boneless salmon filet, about 1-inch thick
1/2 lime
2 Tbsp white wine
1/2 tsp kosher salt
1/2 tsp onion powder
1/2 tsp garlic powder
1/2 tsp dried oregano
1/2 tsp dried basil
1/2 tsp dried dill
1/4 tsp sweet paprika

Preheat grill to high heat. Make tray out of double-length heavy duty foil, large enough for salmon filet, by folding a long piece in half and folding up all sides with shiny side down. The shiny side reflects the heat which keeps vegetables from burning. Spray entire inside of foil tray with cooking spray (I brushed mine with avocado oil, which is a high-heat oil). Place foil tray on platter to transport to grill.

Place salmon on foil tray with skin side up; or boned side up if skinned. Squeeze lime juice over salmon and sprinkle with white wine. Spread top of salmon with mayonnaise. (I always use grapeseed oil mayo because I love the flavor and grapeseed oil is an antioxidant. If you are going to eat a bit of mayonnaise, it might as well have health benefits, right)?

In small bowl, mix together all spices with the exception of sweet paprika. Sprinkle mixture evenly over top of salmon then top with sweet paprika. Place foil tray on grill. Cook on hot covered grill for 10 minutes per inch of thickness. Do not overcook or fish will be dry. Turning is not necessary. Salmon is done when it turns light pink color throughout and feels firm when gently pressed with back of fork. Use spatula to lift from skin to serve. Garnish with lime slices, if desired.


Without becoming as long-winded as we all know I can be, let me tell you that this is a very nice salmon preparation. The herb mixture created a lovely crust on top but the inside remained juicy. It is quite easy to overcook salmon so I was pleased that the texture came out so perfectly. I thought the flavors melded well together without overwhelming the salmon's mild flavor.

I served this dish with a sliced potatoes, yellow squash, zucchini and red onion that were prepared in a vegetable basket on the grill. All in all, this was a healthy, light and delicious meal. This is not the fanciest recipe I have prepared, but it was definitely tasty enough to make again in the future.

Recipe Source:
homecooking.about.com

Thursday, September 8, 2011

Garlic Roast Chicken and Boulangere Potatoes


Photo Courtesy of Brad Lovejoy

I am about to shock the pants off of those of you that know me well. If I didn't have a photo to prove it; you probably wouldn't believe me. For my third recipe this week, I chose Garlic Roasted Chicken. I am not talking about chicken breasts, which I can usually handle preparing, I am talking about a whole chicken that I seasoned and stuffed myself. For those of you that are not familiar with my anti-chicken stance, I have only eaten chicken one time in the past 13 years and that was because I was a judge for a cooking contest. There was no concrete reason for my initial disinterest in eating chicken, but after this many years, it has become a habit. I have been contemplating preparing chicken for Brad and Olivia for the past few weeks but I was putting it off. My final pursuasion occured when I was innocently leafing through one of my french cookbooks and I found the following recipe for Garlic Roast Chicken.

Ingredients:
3 whole heads of garlic
1 (4- to 5-pound chicken); I used a free-range all natural chicken from PCC Market
4 rosemary sprigs
1 lemon, sliced
sea salt, to taste
reshly ground black pepper, to taste
olive oil for pan
2 Tbsp all-purpose flour
3/4 cup dry white wine, plus more as needed
bunch of flat-leaf parsley, finely chopped

Break garlic cloves away from bulbs, place in small saucepan, cover with water and simmer gently with lid on for 30 minutes. Cool garlic in water. Drain garlic cloves but don't throw water away. Heat oven to 350 degrees. Carefully ease skin away from chicken breasts. Place sprig of rosemary and lemon slices between skin and meat on each side. Stuff cavity with remaining rosemary and lemon slices, along with garlic cloves. Season with salt and pepper.

Drizzle roasting pan with olive oil, place chicken in pan and roast according to weight: 20 minutes per pound, then 20 minutes extra. Transfer chicken to carving board and keep warm while making sauce. Place roasting pan over low heat on stove, add flour and whisk well. Slowly pour in reserved garlic water, whisking constantly. Add most of white wine, bring to boil and adjust consistency with extra wine if desired. Pass through sieve into saucepan, add parsley and bring to simmer. Carve chicken and serve with sauce.

First of all, this chicken smelled heavenly while cooking in the oven; even for a non-chicken eater. Second, I served it to Brad, Carl and Olivia and it went over like gangbusters. I sucked it up and took one bite and I have to say that it was tasty. I am not converted but if I was a chicken eater, this is a dish I would prepare again. I grilled a slice of thin pork loin for myself and topped it with the sauce. I loved the sauce! There is something about white wine that raises the flavor quality of a dish. White wine definitely works well with garlic and fresh parsley.

I decided to cook a second recipe from the same french cookbook as a side dish for the chicken. You may have noticed that I have been preparing a lot of vegetable-centric dishes lately. The reason is two-fold; 1) this is a fabulous time of year for fresh vegetables and 2) I have been working out with a trainer twice a week so I have been trying to eat as healthy as possible. I fell off the wagon for this recipe. Okay, I willingly jumped off the wagon but you know what I mean. The side dish I chose is Boulangere Potatoes. In the tradition of many wonderful french recipes, butter is a crucial ingredient in this dish. Recipe follows:

Ingredients:
2 1/4 pounds baking potatoes
2 onions
2 Tbsp unsalted butter, plus softened butter for dish
few thyme sprigs
sea salt, to taste
freshly ground black pepper, to taste
1 1/4 cups chicken or vegetable stock, heated

Heat oven to 350 degrees. Peel potatoes and slice very thin using a mandoline or food processor. Slice onions in same way. Butter shallow baking dish and make layers of potatoes and onions, with thyme leaves (stripped from stalks), salt and pepper sprinkled over each layer. Finish with layer of potatoes and try to make a neat overlapping pattern with them. Using the flat of your hand, press down potatoes firmly.

Pour in hot stock. Cut butter into little pieces and dot top with them. Cover with aluminum foil and bake for 1 hour. Remove foil and bake for 30 minutes. Potatoes should be soft all the way through and top layer golden brown.

Photo Courtesy of Brad Lovejoy

Okay, these potatoes are ridiculous! How can something so simple be so perfect? The top layer was a light golden color and the bottom layers were tender and rich. The potatoes melted in my mouth. I don't know that I have ever eaten potatoes that melted in my mouth but I am willing to go there again for sure.

As a final note, I used rosemary, garlic, walla walla sweet onions and thyme from my garden for the recipes. I appreciate that my garden is providing us with so many ingredients this summer. I can't wait to add even more vegetables next year. I think my space planning will improve so I should be able to include carrots, more onions, different types of peppers and additional varieties of lettuce.

Recipe Sources:
Garlic Roast Chicken (Poulet a l'Ail)
"My French Kitchen" by Joanne Harris
Page 105

Boulangere Potatoes (Pommes Boulangere)
"My French Kitchen" by Joanne Harris
Page 164

Wednesday, September 7, 2011

Zucchini Linguine


Photo Courtesy of Brad Lovejoy

Before I began my cooking project and my cookbook library rapidly expanded, I had two cookbooks that I went back to time and time again. Both books are by Donna Hay and they are fabulous. The recipes are easy to prepare, simple in ingredients but flavorful and sometimes even decadent. The photography is beautifully done and the layout is user friendly. For this recipe, I called on my old friend, "Off the Shelf; Cooking From the Pantry" by Donna Hay. The pasta chapter of the book offers a section called 'short order' which is a sampling of easy-to-cook recipes. I had just picked a red chili pepper and two zucchini from my garden so it was as if the Zucchini Linguine recipe had magically appeared, just for me. The recipe is as follows:

Ingredients:
14 ounces spaghetti or linguine (I used all natural Fresh Egg Linguine handmade locally by Cucina Fresca)
3 grated zucchini (I used 2 fairly large zucchini which worked great)
2 Tbsp olive oil
2 seeded red chillies (I used only one to keep the dish mild for Olivia)
2 cloves crushed garlic
cracked black pepper
sea salt
shaved parmesan

Cook linguine until al dente, then drain. Heat frying pan over high heat. Add olive oil, red chillies and garlic and cook for 2 minutes. Add grated zucchini to pan and cook for 2 minutes. Toss through hot pasta and serve sprinkled with cracked black pepper, sea salt and shaved parmesan. Serve with lemon wedges.

This is a gorgeous dish for both the eyes and palate. I may sound like a broken record, but I highly recommend using a high quality pasta. It makes every difference in the final texture of the dish. I used a Raw Milk Reggiano Parmesan from Italy that I purchased at PCC Market. The cheese added the perfect amount of richness and nuttiness to the pasta. On a fun side note, I purchased a hand grater with a serrated edge today and I love it! All I had to do is repeatedly slide it down the zucchini to achieve thin zucchini strips. Finally, I prepared salad using vegetables from my garden. It was so fun to walk down the steps to the garden only to find plenty of chard, arugula, romaine and cherry tomatoes to prepare a salad for each of us. Aren't my vegetables pretty? I am so proud!

Photo Courtesy of Brad Lovejoy

Recipe Source:
"Off the Shelf; Cooking From the Pantry" by Donna Hay
Page 30

Sunday, September 4, 2011

Mango Avocado Salad


Photo Courtesy of Brad Lovejoy


After contemplating my mango avocado salad idea from last week, I decided to go with it. I did however, drop the addition of arugula when I realized I was forcing the issue. I sorted through several mango avocado salads on google and decided to choose a simple recipe that allows the ingredients to shine. I must say, I am quite pleased with my decision. This is possibly the perfect avacado mango salad.The sweetness of the mango was complimented perfectly by the creaminess of the avocado. The lime juice and balsamic provided a pleasing level of acidity which balanced beautifully against the bite of the red onion. I almost sound like I know what I'm talking about! :) This recipe uses simple ingredients that yield complex flavors. I recommend it as a summer side dish or as a lovely option for a light lunch. I actually ate most of the dish for lunch today. I offered to share but Brad and Olivia had just eaten lunch down at Alki Beach. I gave them a few bites, they approved and then I proceeded to finish it off. Please enjoy the recipe as much as I did.

P.S. Aren't the colors of mango, avocado and red onion beautiful together?

Ingredients:

1 Tbsp balsamic vinegar
1 Tbsp lime juice
2 Tbsp extra virgin olive oil
2 mangos, cubed
2 avocados, cubed
1/2 small red onion, diced
salt and freshly ground black pepper

In a large serving bowl, whisk together vinegar, lime juice, salt and pepper to taste. Slowly whisk in oil. Toss in mangos, avocado and red onion to coat. Serve immediately. Serves 4.

Recipe source:
foodnetwork.com

Saturday, September 3, 2011

Stonewall Kitchen Farmhouse Pancakes


Photo Courtesy of Brad Lovejoy

One of my simplest and most treasured pleasures is spending time with Olivia. It doesn't matter what we are doing; she is the light of my life and joy of my heart. When we woke up this morning, I decided that it would be a great morning for pancakes. Olivia and I had a great time choosing several animal-shaped cookie cutters at Mrs. Cook's kitchen store last week so I knew she would be excited to use them with the pancakes. She also loves to pour ingredients in the bowl and stir. She is my perfect little kitchen helper for sure.

Photo Courtesy of Brad Lovejoy


I know this isn't a "from scratch" recipe as I normally choose; but I am a big fan of Stonewall Kitchen Farmhouse Pancake & Waffle Mix. Why reinvent the wheel? This is only the second time I have purchased the mix but when I used it for waffles the first time, I was hooked. The mix incorporates vanilla and a bit of malt, which creates a deliciously unique flavor. I highly recommend purchasing the mix for your own kitchen, whether you prefer waffles or pancakes. I also recommend this as a great recipe for kids to prepare. Olivia was able to do almost everything herself, with minimal guidance, and she felt so good about her contributions when the pancakes were done. This is the Stonewall Kitchen pancake recipe:

Ingredients:
1 medium egg
3/4 cup whole milk or buttermilk (I use nonfat milk and it works great)
1 Tbsp melted butter
1 cup Farmhouse Pancake & Waffle Mix

Beat egg and milk together. Add dry mix and blend well. Stir in melted butter and mix thoroughly. Ladle onto 350 degree griddle and flip when air bubbles begin to pop. Turn once and cook until done. Makes approximately 5-6 plate-size pancakes (or several cat, mouse, crab, owl, squirrel and giraffe-shaped pancakes. :).

Photo Courtesy of Brad Lovejoy

I recommend doubling the recipe if you are preparing pancakes for more than two people. I was able to get 5 medium-size pancakes but they are a little bit thinner than some pancakes so double batter would work better for 3+ people. I also recommend serving the pancakes with pure organic maple syrup. We use Shady Maple Farms organic syrup, which is made in Quebec. There is just nothing like the rich flavor of pure maple syrup.

As a side note, Stonewall Kitchen makes many fabulous products but we are especially fond of their jams. Brad's favorite is their Strawberry Rhubarb jam. He used it on his toast every morning for well over a year. This is a true testament to how good it is!

Thursday, September 1, 2011

Easy Dragon's Tongue Beans


I found the most beautiful ingredient at Metropolitan Market today! I have never been introduced to Dragon's Tongue beans and they are now officially one of the prettiest and most interesting vegetables I have come across. The best way I can describe them is that they are flatter than a regular green bean and muted yellow in color with saturated purple streaks and spots. After conducting basic research, I learned that they can be picked to use as a snap bean or allowed to mature into a shell bean and that they are usually blanched or sauteed to preserve their fresh, crisp flavor.

Metropolitan Market presented the Dragon's Tongue beans on a produce stand with green beans, yellow beans and purple beans. My favorite combination aesthetically was Dragon's Tongue with the yellow and purple so I came home with all three varieties. The recipe below, although simple, is the one I chose in order to showcase such a gorgeous product.

Ingredients:
2 1/2 cups beans
2 Tbsp olive oil
5-6 cloves garlic, crushed
1 tsp dried basil or 1 Tbsp fresh basil, chopped (I used fresh basil)
salt and freshly ground pepper to taste

Steam beans until tender, about 3 to 4 minutes. (I put about 2 inches of water in pot, brought water to boil, placed a metal steamer in pot and covered to achieve steaming process). Toss with olive oil, garlic, basil, salt and pepper. Serve immediately.


As you can see from the photo above, when steamed, Dragon's Tongue beans lose most of their color and purple beans turn green. I became aware of this during my initial research so I made sure to have Brad snap a photo of the beans prior to preparing the recipe. The natural colors are so vibrant that I was a bit sad when they faded. Oh well, the important thing here is that the beans were delicious. The garlic could have been toned down a bit but other than this, I would prepare them the same way. This quick-steam preparation kept the beans crisp and the mild flavor intact. The beans would also be perfect sauteed with olive oil and seasoned exclusively with salt and pepper. I thoroughly enjoyed preparing such a lovely ingredient that I didn't even realize existed until today. How fun is that?

Recipe Source:
tastytrends.blogspot.com